Seamless3d III Featuring a Greatly Simplified Interface
- 3.001 Update
- 3.002 Update
- 3.003 Update
- 3.004 Update
- 3.005 Update
- 3.007 Update
- 3.010 Update
- 3.011 Update
- 3.012 Update
- 3.013 Update
- 3.014 Update
- 3.015 Update
- 3.016 Update
Version Update Index
2013 October 19, 22:24 GMT
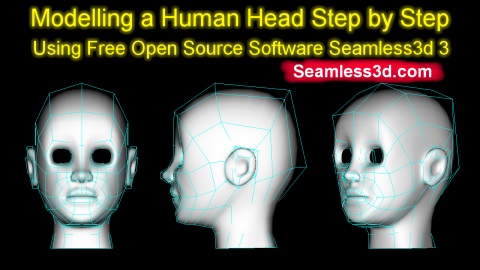
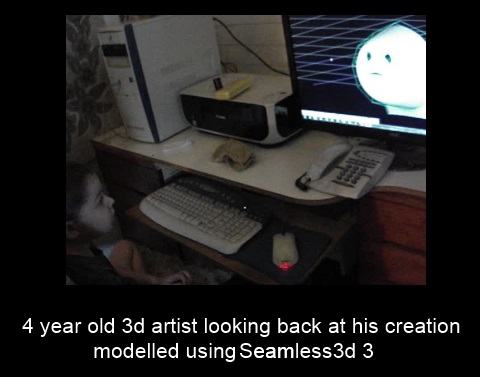 Although Seamless3d 3 has evolved from version 2 and maintains being a general purpose modeller, this is the very first version (3.000) to be released after major changes have been made to the design, so please treat it like a prototype as it is not yet complete and there are many scenarios it can not yet deal with, however if you follow the Modelling a Human Head Step by Step Using Free Open Source Software tutorial video, which is very easy to follow, you have the certainty of being able to model a human head in your own style.
3.001 Update
2013 November 26, 11:23 GMT
3.001 has been made significantly more forgiving for beginners who make simple mistakes when following the Modelling a Human Head Step by Step tutorial.The toolbar has been split in two so that the top bar is now at the top of the 3d window and the lower bar is at the bottom of the 3d window. The reason I made this change was because I realised when in animation mode, the lower bar is redundant and so I thought why not replace the lower bar with the Anim bar. Because this would result in the top bar moving up to make room for the Anim bar it seemed a better idea to split the bar so that the top bar can stay positioned permanently at the top of the 3d window. It annoyed me to make this change as the modelling a human head step by step tutorial will now look a little different to what the user sees but this tutorial is essentially up to date as the buttons look the same and function the same, just the top bar has changed its location.
The Anim bar now uses up the full width of the 3d window by default.
When seamless is put into skeleton edit mode, the lower toolbar changes so that it contains buttons that are in context for editing a skeleton. New bones can still be added by holding down the right control key while clicking but now the cursor changes to give feedback. Also to make seamless more self explanatory and be consistent with other operations, there is now a button the user can click to add bones. By default if the user drags a bone while in skeleton edit mode, all of the dependent bones will move with the bone being dragged same as before but now there is the option of being able to drag a bone without its descendent bones changing their location by clicking the toggle drag with descendants mode button.
A number of shortcut keys have been assigned for commonly used functions:
|
If the user clicked the extrude button before selecting a control point, 3.000 would crash but 3.001 wont.
If the user accidently clicked on empty space (missed a control line) after clicking the insert control line button and then clicked anywhere inside the 3d window 3.000 would crash but 3.001 wont.
3.001 has had code added to end temporary modes automatically to make seamless less critical for the user to remember to click done, for example, after adding a lathe.
If the user clicked undo and then tried to hide the grid, the grid would not hide for 3.000 but it does for 3.001
When creating a NurbsLine, 3.000 would crash. This bug has been fixed for 3.001
There are now 2 rotation levers in Anim mode and the Anim levers reset when the view is changed the same as for modelling mode.
A field drag3dSensitivity has been added to the Settings control panel so that the mouses sensitivity can now be adjusted when dragging in the 3d window.
Many thanks to Carlos for his feedback and bug reports.
3.002 Update
2014 February 24, 05:15 GMT
A new hands modelling tutorial has been uploaded. With this and future tutorials in mind, 3.002 addresses a number of issues which makes Seamless3d easier to use.Adding Boxes more uniform with adding lathes
When adding a box the length width and height can now be set and 2 boxes will be added in mirror mode.Adding Spheres more uniform with adding lathes
When adding a sphere the radius can now be set and 2 spheres will be added in mirror mode.Grouping patches made more effective
Seamless3d III made it so patches do not need to reference part nodes. This significantly reduced the clutter in the scene tree window but it is still nice to be able to specify different parts for different groups of patches in a model. This desire has been addressed by making it so that a group of patches contained in a GroupBuild node will now generate triangles for the part referenced by the GroupBuild.When a lathe, sphere or box is now converted to a patch/s, a BuildGroup node is added to contain the patch/s.
When importing patches from a file a BuildGroup node is automatically added for the imported patches if they do not already have one.
Object Select mode functionality
Object Select mode now has some functionality added. In Object select mode you can now select an Object (a Seamless node) by simply clicking on its geometry in the 3d window. In the future you will also be able to select a Camera/Viewpoint or a Light. Pink lines mark the selected object.X Y X drag filter
You can now globally filter which dimensions you can drag any number of selected points by opening the control point selection control panel (click the pink flower button) and using the xTug, yTug and zTug check boxes.Create mirror polygons for selected part working in BNSPE
In poly edit mode you can now create an exact mirror copy of your triangle structure for the opposite side selected (a selected vertex selects the side) by clicking the mirror part button. This works for BNSPE (Borderless Nurbs Surface Poly Editing).Automatically add parts when importing patches
You no longer have to manually add parts with matching names when importing patches and build nodes that reference parts because when seamless can not find a matching name it will now add a new part.Drag view in paint mode
When in paint mode if you drag on empty space you can pan the view same as you can in other modes so long as the paint brush radius is out of range of any triangles.New inside out part button for poly edit mode
In Poly Edit mode you can now create polygons for a selected part inside out. This function departs from using copy and paste, instead you select the part for the source then click the inside out button which will open a control panel which contains an add check box and an ok button. While the control panel is open you can select a different part for the destination polygons.Visual radius for paint brush
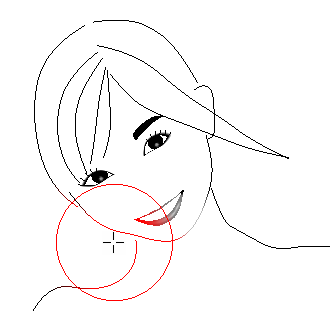
A circle around the center point of the paint brush is displayed in the 3d window as a helfull visual clue to show the colour and size of the brush.Adjust brush radius using mouse wheel
You can now adjust the radius for the paint brush and the radial tug using the mouse wheel if you hold down the left control key.Part selection in paint mode made easier
You can now select a different part in the scene tree window without switching out of paint mode.Frequent crashes in paint mode fixed
A bug that would often crash seamless when using the paint brush has been fixed.Sphere conversion issue fixed
When converting a sphere to a patch the type of patch was incompatible for stitch patch modelling. This has now been fixed.Import patch auto name fail fixed
In some scenarios seamless would fail to create a patch with a unique name when importing patches. This has now been fixed.Recent files link crash fixed
A Crash could result from clicking on a link in the recent files list if the file opened into paint mode. This has now been fixed.Nurbs lathe orientation spindle bug fixed
The mouse cursor failing to change state after moving the cursor away from the nurbs lathe orientation spindle when adding a lathe has been fixed.3.003 Update
2014 November 18 GMT 00:19
Please see the video made to accompany the release of this version: Seamless3d 3.003, Water Crisis, Antechinus, Winter VlogDiversions more reliable
Most of the time spent on the upgrade has been on making Seamless be able to deal with a wide range of scenarios when diverting a control line.Positive symbol shown when adding a lathe
A positive symbol (plus sign) is now displayed at the base of the lathe's spindle when adding a lathe. This is to indicate which side of the lathe the user should start adding their control points at. The user should start on the positive side and move in the direction the end of the spindle is pointing to if it is desired for the lathe to begin being visible on the outside.Export Obj working again
In the upgrade to the new layout for Seamless3d 3, the menu for exporting obj files was broken. This is back working again for 3.003Techuelife Island working again for Seamless chat
3.002 made it so that you no longer have to manually add parts with matching names when importing patches but this apparently did not extend to other build nodes such as spheres and boxes which has been addressed for 3.003Automatically add parts when importing spheres, boxes, lathes etc. too
3.002 made it so that you no longer have to manually add parts with matching names when importing patches but this apprently did not extend to other build nodes such as spehres and boxes which has been addresed for 3.003Boxes & Spheres can be added in other dimensions
Until now, boxes and spheres could only be added to a xzPlane. With 3.003, boxes and spheres can be added to any plane that is specified for the grid.Boxes can be added negative side of grid
Whether you’re looking down at the grid or up to it, forward, backward, left or right, boxes can be added to the grid.Fixed add lathe bug
When adding a lathe, a bug would occur if the user accidently dragged the mouse when selecting a point to set the orientation of the lathe. This has been fixed for 3.003Fix import node bug
When importing nodes from another file, a bug could occur depending on what names were used for the nodes. This has been fixed for 3.0033.004 Update
2017 January 25 15:54 GMT
During the last 2 years since I last uploaded I have been busy using seamless every day, debugging and making refinements. Though you will be able to notice some changes, none are too great to break any of the tutorials written for Seamless3d 3. There are still a number of bugs I very much want to fix but because this version has significant improvements, it seems a good idea to upload what I have now for the new year.Easier to click on a control point
To assist targeting a control point, a visual aid to mark the point will appear when the mouse is over the point to indicate it will be selected if clicked on. This feature allows for a greater range around the mouse pointer reducing the amount of time needed in getting the mouse close enough to the target.Extra clickable points added to the rotation/control lever
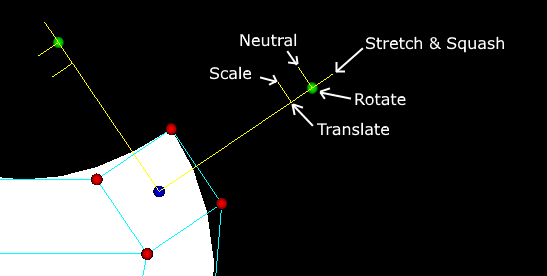 The rotation/control lever has additional points around the green points so that the user can determine the function of the lever using only the mouse instead of being dependent on keyboard keys for this. A beginner who does not follow tutorials will sooner or later notice how the cursor changes when it passes over these points and learn the functionality of each point from just playing.
In testing the new lever, I have occasionally accidentally clicked on one of the new points around the rotation points while trying to click on something else which has made me question if adding extra points is an improvement. I think the new lever will make seamless easier for beginners but I have added the option of being able to switch off the new points for more experienced users who may prefer using keys. Switching off the extra clickable points can be done by opening the settings control panel and unticking the multiPointLever checkbox.
Manual stitch editing
 The work gone into making seamless so that there is no need to manually stitch patches together to model a structure as complex as a human head is what makes Seamless3d 3 easy to use but users can benefit from manually stitching patches together.
Manual stitching allows for transplanting parts such as a nose, a mouth, or hands from one model to another. With manual stitching it is easier to make complex structures such as a human ear with greater detail.
See the new tutorial Stitching Nurbs Patches for more info.
The work gone into making seamless so that there is no need to manually stitch patches together to model a structure as complex as a human head is what makes Seamless3d 3 easy to use but users can benefit from manually stitching patches together.
Manual stitching allows for transplanting parts such as a nose, a mouth, or hands from one model to another. With manual stitching it is easier to make complex structures such as a human ear with greater detail.
See the new tutorial Stitching Nurbs Patches for more info.
Looping control lines
Control lines can now be inserted into a model that loop. This in effect allows us to be able to extrude more than a single point.Indexing of control points
Until this version, stitching relied on the physical location of points to determine which points are stitched together. This worked fine for most scenarios but could pose problems when you did not want points to join together like in a mouth for example which you may want to model it closed but want the option of the mouth opening for animation. This is not a problem with this version because points no longer automatically fuse together just because of where you happen to leave your points.Hiding polygons belonging to hidden patches
Polygons belonging to certain patches can be hidden from view by hiding the patches (hiding the cages more specifically) when the toggle hide polygons in hidden patches button is active.NURBS IK animation
 The big problem I encountered with Inverse Kinematics for walking legs was there was a need for the legs to straighten for a period in the walk cycle. When knees go from being straight to slightly bent they can be very unstable giving rise to jerky movement. Fine tuning can help but fixing the jerks felt more like a black art than a science for me.
Blending FK and IK during the walk cycle can make things feel more logical in what to do to bypass the jerks but this complicates the task which I fear is likely to scare away beginners.
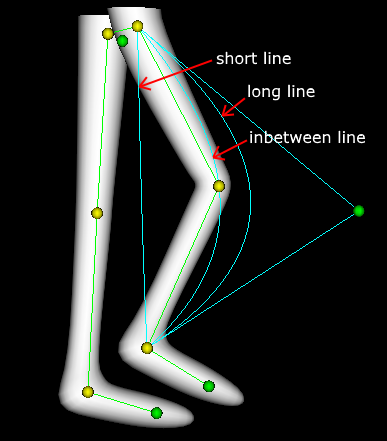
My latest approach is to have the limb automatically bend so that the joints automatically touch a point in a curved line. This line is derived from 2 curved lines defined by the artist, one of the lines is short, the other is too long for the last joint in the IK calculation (the ankle in the case of a leg) to reach the end of the curved line. Seamless uses these 2 user defined lines to create a line that is just the right length for the last joint to reach the end of the line.
I have not yet had enough time to fully test this method but I am encouraged from what I have experienced so far, I love how stable a limb keeps while going from straight to slightly bent.
The big problem I encountered with Inverse Kinematics for walking legs was there was a need for the legs to straighten for a period in the walk cycle. When knees go from being straight to slightly bent they can be very unstable giving rise to jerky movement. Fine tuning can help but fixing the jerks felt more like a black art than a science for me.
Blending FK and IK during the walk cycle can make things feel more logical in what to do to bypass the jerks but this complicates the task which I fear is likely to scare away beginners.
My latest approach is to have the limb automatically bend so that the joints automatically touch a point in a curved line. This line is derived from 2 curved lines defined by the artist, one of the lines is short, the other is too long for the last joint in the IK calculation (the ankle in the case of a leg) to reach the end of the curved line. Seamless uses these 2 user defined lines to create a line that is just the right length for the last joint to reach the end of the line.
I have not yet had enough time to fully test this method but I am encouraged from what I have experienced so far, I love how stable a limb keeps while going from straight to slightly bent.
Files generated for POV-Ray with perspective fixed
Seamless3d has been fixed so that what you see in the 3d scene with perspective enabled is now what you see when scenes are rendered with POV-Ray.Graphic interface for Dim filter
The mouse can now be prevented from dragging control points in 2 of the dimensions by clicking the dim filter button and then clicking on the arrow that points in the dimension the user wishes to drag in. Dragging in 2 dimensions simultaneously can also be performed by clicking on one of the points that adjoins 2 of the arrows. If the left Alt key is kept down while dragging control points, the user can drag in the selected dimension/s without needing to reselect the dimension each time. The graphic interface replaces the xTug, yTug or zTug check boxes.
Radical patch
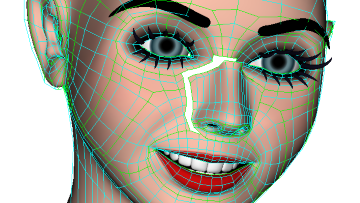
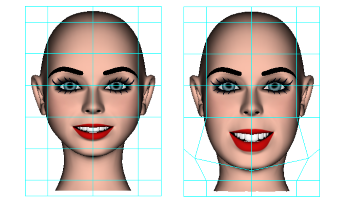 When modifying a face I will typically want to try scaling different areas of the face like the mouth for example which can be done by selecting the points in the mouth and scaling the selected points. This often works out well but typically I want to scale the selected points different amounts depending on the positions of the points which lead me to develop the radical patch for 3.004.
See the new tutorial Radical Patch for more info.
When modifying a face I will typically want to try scaling different areas of the face like the mouth for example which can be done by selecting the points in the mouth and scaling the selected points. This often works out well but typically I want to scale the selected points different amounts depending on the positions of the points which lead me to develop the radical patch for 3.004.
See the new tutorial Radical Patch for more info.
Smoothing patch
I have for a long time thought about smoothing patches that have many control lines close together with a patch that has fewer control lines. This idea has been put into practice for 3.004. See the new tutorial Smoothing a Surface with a Smoothing Patch for more info.Added features for NurbsLines

A lot of work has gone into improving the NurbsLine. When adding a new NurbsLine, a mirror line can also be simultaneously added much the same way as when adding a new NurbsLathe. The colour of a new line is now determined by the selected colour in the palette which can be set in paint mode. If you want a line to loop, you can now click on the first point when adding a new line to complete the task.
A number of functions that apply to nurbs patches have been extended to nurbs lines. NurbsLines can be duplicated using the duplicate selected patches and duplicate mirror patches buttons. Lines can be merged using the merge patches and cut using the cut patches buttons.
A new feature I find very useful is converting lines to patches using the butterfly button. See the new tutorial Sketching with Nurbs Lines for more info using nurbs lines.
Duplicating patches
The duplicate selected patches button now functions. To duplicate, first select the patches using the rectangle selection tool and then click the duplicate selected patches button. This will open a control panel that offers a number of options before completing the function by clicking the ok button.Duplicate mirror patches
The duplicate mirror patches button now functions. This function creates duplicate patches in mirror form from any patches selected at the time of clicking the duplicate mirror patches button.Hide cage function extensions
Two new buttons have been added to assist hiding cages for patches, show selected groups and hide selected groups. The functionality of these 2 buttons are similar to show selected cages and hide selected cages but apply to all the rest of the patches contained in the same group as the selected patches. For example, all of the cages for the patches contained in a GroupBuild node can now be shown by clicking on only one control point. I have found this to be very helpful.Select all points for selected patches
All of the points in the selected patches can now be selected by clicking the select all points in selected patches button. So for example, we can select all the points in a hand with precision without needing to worry about where exactly the patches for the hand begins in the arm.Camera with look at point
Seamless3d uses a Viewpoint node for the camera which it has inherited from VRML. Using only a position and orientation field to keep the camera focused on a character's face when the character is moving has proven to be needlessly awkward, so I have added 3 new fields: aim, lookAt and up to the Viewpoint node. When the aim field is ticked the position, lookAt and up fields automatically calculate the value for the orientation field. The position, lookAt and up fields can be directly set using the Viewpoint's control panel or set by dragging the blue position, yellow lookAt and green up control points when Seamless3d is in select object mode.Reduced sensitivity for changing the orientation of the view
I have greatly reduced the sensitivity for changing the orientation of the view when using the mouse (right drag). I felt surprised by how erratic and horrible it felt when I tried the old setting after testing out the new setting. It's funny how you don't realise how bad things can be when you are use to it.Closer nurbs control points take priority
When clicking on a nurbs control point there may be more than one point within clickable range while only one point is visible due to the control point or geometry hiding the others. I have made it now so that when there is more than one within range the closest to the screen gets clicked.Unselecting points bug fix
The rectangle selection tool along with it the unselect feature predates Seamless3d 3. Unfortunately there was a bug that would appear quite often (but not often enough to make it easy to catch) when unselecting points. This most annoying bug would cause selected points to jump erratically when dragged. Because I was aware of it I would try to avoid unselecting points which delayed the bug getting fixed but i am pleased to say it is now fixed for 3.004 so I no longer hesitate to unselect points :)Known bug added
From time to time I experience 3.004 crash when I click on a control point in the rotation/control lever or a control point in the dim filter. I don’t recall this bug appearing in previous versions. Because I don’t yet know what scenario makes this bug assert itself, it is not an easy bug to catch but I am feeling confident I will be able to soon follow this version with a fix.3.005 Update
2017 August 20 20:12 GMT
Animation
This is an important update as this is the first version where Seamless3d III has been worked through for an animation tutorial. This tutorial: Creating an Animated Character Step by Step Using Free Open Source Software, starts with modelling the character from a box and ends with a fully animated jumping character.
Although this tutorial is minimalist, it teaches the essentials to create high quality nurbs animations. This tutorial challenges the notion that 3d animation is too complex and not worth doing unless you have the money to pay a team of experts to work for you. Of course there's no limit to how much time you can spend perfecting the art but don't let this prevent you from creating animations. If you can find time to draw with a pencil or learn to play a musical instrument, you can find the time to make worthwhile animations without restrictions on your artistic freedom.
Tilted View at Start Up
The first thing a well seasoned Seamless3d user will notice is the view is tilted when seamless is started. This makes it much easier for an absolute beginner to begin modelling when beginning with a box as there is no need to change the view to set the 3 dimensions, they just have to click once to position the box and then 2 more times to set the dimensions and the box is complete.
Paint Brush for NurbsLines
NurbsLines can now be coloured in paint mode with the brush.
NurbsLines Can be Drawn
In addition to being able to add a NurbsLine by plotting the control points, the new draw NurbsLine feature lets you add a NurbsLine by drawing a line. After the line is drawn, a NurbsLine is automatically evolved to approximate the drawn line with the given number of control points.
See the Drawing NURBS Lines tutorial for more info.
Faster to add NurbsLines
Now if after you add a NurbsLine by plotting or drawing it and you go back into Home mode, the control panel for adding the line will remain open. This allows you to immediatly plot or draw a new line without clicking any more buttons.
Function Key F2 to Toggle Between Home & Modelling modes.
This feature can greatly assist adding nurbs lines whether plotting or drawing them.
This feature can also speed up seeing your model without any control lines and resume modelling.
Double click no longer toggles between home mode & modelling mode as I found this too easy to do by accident when using a pen.
Graphics Pen & Touch Tablet Support
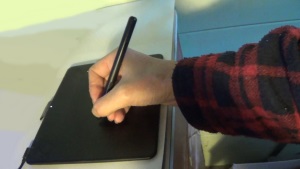
In previous versions if you wanted to use a pen, you would have needed to set your pen to operate in mouse mode where movements are relative but 3.005 adds support for pen's operating in absolute mode which is how pens are normally used.
Although the pen I have been developing with (a Wacom Intuos CTH-490) has 2 buttons on it that can act like the right and middle buttons on a mouse, I find them more awkward to use than a mouse so I have added some shortcut keys which can replace the use of the right or middle mouse buttons and the mouse wheel.
See the tutorial: Using a Graphics Pen & Touch Tablet
Spinning the view
If you hold down the Alt key you can spin the view (rotate on the Z axis) by dragging left or right some distance from the centre of the 3d window.
This was developed for a pen in mind but works fine for a mouse too but take care not to drag up or down to avoid zooming the view.
New Short Cut Keys for Dim Filter
Because the Alt key is now used for spinning and zooming the view, Ctrl and Tab replaces Alt and Space to control the Dim Filter.
Press Ctrl + Tab to open the Dim Filter.
If the Tab key is kept down while dragging control points, the user can drag in the selected dimension/s without needing to reselect the dimension each time.
Enter Key to Insert Points Replaces Right + Ctrl
Because not all keyboards have both right and left Ctrl keys and right handed users may prefer using keys from the opposite side, I have decided to replace Right + Ctrl with the Enter key to insert points into a NurbsLine or a NurbsLathe. (Click on the control line between 2 control points while holding down the Enter key).
seamless3dSetup.smls replaces seamless3dSetup.wrl
The only reason for this change is it was the easiest way to change some default settings.
Important bug fix
A bug documented in the 3.004 update that caused seamless to crash at times when clicking on control points in the lever tool or dim filter has been found and fixed. I feared this bug would take a long time to find due to its seemingly random appearance so I am very glad this bug showed up in the robot demo when making the animation tutorial as I was then able to trace back the sequence of events that would cause the crash.
3.007 Update
2021 August 21
64 bit
Seamless3d now runs in 64 bit mode. Most of the work done to make this possible was making seamless script compile into 64 bit machine code.OpenGL
Seamless now renders using OpenGL instead of DirectX 8.1 which was getting very out dated. This makes seamless much closer to being cross platform software and allows for many more polygons to be rendered in a model.Auto Stitching Rewrite
Most of the nurbs auto stitching code has been rewritten to make seamless handle a wider range of scenarios, when experimenting with different structures in organic models.Coloured and Textured Vertices Within the Same Model
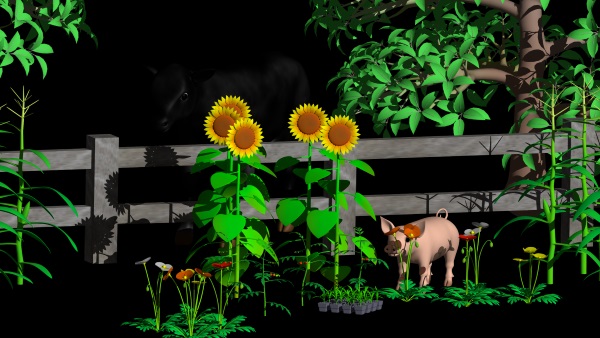
Not only can you now have more than one texture file within a Seamless node, you can now have both coloured and textured vertices within the same Seamless node.Specialised feature to assist making trees
A new specialised feature has been added that lets you create tree trunks with seamless branches much more quickly than was possible before. It is similar to a nurbs line but lets you branch out from the trunk or parent branch and it automatically calculates the thickness for the trunk and branches.Item Bar
The item bar makes it very easy to import groups of patches into a model or a scene. The GroupBuild node now contains an item field which when ticked lets the user delete the whole item by selecting only one or more control points in the group. When the item-bar is used in modelling mode, copies of the item's patches are added to the model but when it is used in Scene Edit mode, the item is added to the scene as a reference to the file.Scene Edit Mode
Known as Select Object mode in versions 2.005 and 3.006, this mode lets the user select a model (Seamless node) within the scene by clicking on it in the 3d window and lets the user position, orientate or delete the selected model. In this mode, the lower toolbar now contains all the item bars same as when in Home mode.Pseudo poly mode
This mode makes non stitched nurbs patches behave like quad polygons when edited in that the patches will have straight edges and will be flat.Poly Edit Mode
Select/Hide Patches Owned by a Part
Hide Polys in Hidden Patches
Paint Mode
Undo
In previous versions, Seamless3d backed up the whole scene after each operation such as dragging a control. This worked well for creating a simple character that does not have a huge poly count but was problematic for larger files such as a tree containing 100s of individual leaves. This would force me at times to turn off the auto backup but this was horrible when I forgot as an undo could then easily result in losing 30 or more minutes of work. I have made file saving faster to reduce the problem but because saving files can still get horribly slow, I have made seamless automatically turn off the undo feature for every operation, if saving the backup takes too long. Seamless will however continue to back up at 5 minute intervals after this happens. To prevent seamless from going into this backup mode, I have made it so you no longer have to have your whole scene contained in a single file because references to other files can now be added to a scene. So if need be you can divide your house up into different sections with each section being contained in a file small enough to be backed up in an instant. To further help speed up saving files, I have made it so the g-zipping of seamless files is now off by default but you have the option of turning it on in settings. I have made it so seamless now makes a backup before performing an undo operation so that a redo can still be performed if the backups for the undo has been automatically turned off for the last few minutes.CalculateRing
Grid
Snapping points to the grid
Polar grid
Snaping the Lever
4 new commands for selected patches
These commands apply to patches that have been selected in the 3d window. The 4 new commands can be accessed by clicking ![]() while in modelling mode.
while in modelling mode.
group selected patches moves the selected patches into a GroupBuild node. mirror selected patches ticks the mirror field. un-mirror selected patches clears mirror field. removes selected patches names this can be used for non mirrored patches
Exporting, importing & duplicating patches
Patches could be imported and exported in previous versions but a number of loose ends have been resolved for 3.007
Dedicated file path for importing and exporting files
This can speed up accessing a folder that contains items such as bricks and tiles because our import folder wont be lost when we save our house to a different folder.
Multiple control point stitch issue resolved
3.010 Update
2021 October 12
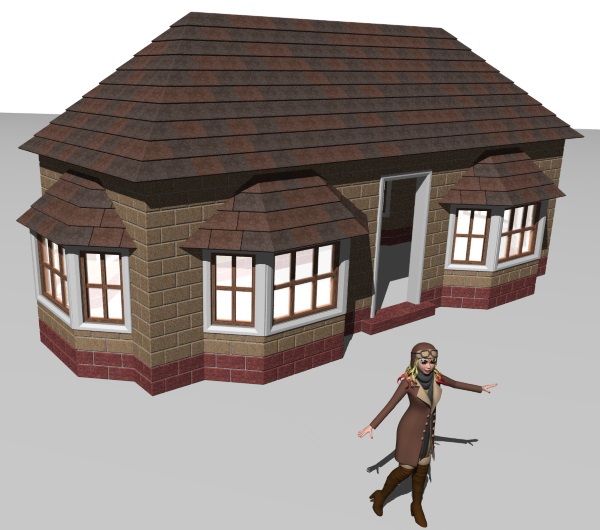
3.010 has been worked through for the Build 3D Bricks & Mortar Wall Tutorial
Nurbs patches can look and behave like quad polygons
The simPoly field has been added to GroupBuild nodes. When this field is ticked, all patches contained within the group build node will behave like quad polygons, so when you drag a corner point a stright edge will be maintained to the 2 adjacent points and mid lines/points will be hidden.Show only items that have a selected point
Hide all cages button
Click item to show cage mode
3.011 Update
2021 December 04
Editing referenced files
3.011 introduces the ability to edit external files referenced from the main file while continuing to see all of the geometry from the other files that make up the whole scene. This feature is at an early stage in development but can be very useful if used with care. For more info on editing referenced files, see the tutoroial: Scenes Composed of Referenced FilesAbility to output referenced files to Pov-Ray as part of the main file or as seperate files
An external field has been added to the scene node for 3.011. When a file with references to files is exported to povray, the referenced files are now output as part of the file they are referenced from unless the referenced file's external field is ticked. You must manually output each referenced file to Povray if the scene node in the referenced file has a ticked external field.3.012 Update
2021 December 20
"save" backs up same as "save as"
Multiple undo channels for referenced files
Nearest line is selected for inserting line
NIK animation improved
NIK animation is made easier for creating walk animations that require legs to be straight (not all the time) during both the phase when the pelvis position is controlled by the hip position and the phase when the pelvis position is controled by the opposite hip position. When the pelvis is controled by the opposite hip position the short and long ankle points are now free to be in 2 different locations.CPP binding fixed
Insert line in middle bug fixed
3.013 Update
2022 January 25
BVH import bug fixed
Some refinements to the code for IK (Inverse Kinetics), NIK (NURBS IK) and RH (Reverse Hierarchical) animation have been made.
3.014 Update
2022 April 21
The user is notified if referenced files in a scene have been modified and unsaved on exit
More than one instance of Seamless3d can be run without one instance messing up the other's undo file list
3.015 Update
2022 May 14
Some important bug fixes relating to file referencing and the undo feature have been made
A bug that prevented the user from inserting a control line radiating out from a spider web center has been fixed
3.016 Update
2022 June 13
Click to Import Item's Texture Only
You can now use the item bar to select only the item's texture, and then click on existing items in your model to change the texture of those items. To do this first press Alt T while in Item bar mode. After doing this you will see the cursor changes to indicate it is in click to import texture mode. Click on an item in the item bar to select a texture and then click on items in your model to change their textures.
Precise Non Right Angle Snap
Although there was support for brick snaping for non right angled walls in previous versions, 3.016 addresses a number of issues that arose when laying tiles for such walls and adds a number of features such as being able to orientate the grid using the lever tool and being able to record orientation and position points for the grid to assist non right angled wall building. Watch the video: Non Right Angle Snap for 3.016
Important Bug Fix
3.016 has another important bug fix regarding saving multiple file references on exit. This is an important bug fix because 3.015 could save files incorrectly making them unable to open. Fortunately 3.015 would have made a backup of any file being saved by renaming it before saving and this scenario would not have occurred from following any of the tutorials in the main tutorial list. It would only occur if you had edited multiple file references which is a new feature still in development as stated in the tutorial: Scenes Composed of Referenced Files
[3d Modelling Software] [Tutorials] [Forum] [Features] [Download] [Gallery] [FAQ] [Chat] [Avatars] [Links] [Thyme]