Beeline to Animation
The Basic idea
To show a direct path to animating parts containing different shapes and how a part's animation is affected by it's parent part.
How long does it take?
It takes
just 30 seconds from creating a seamless file to animating a cone!
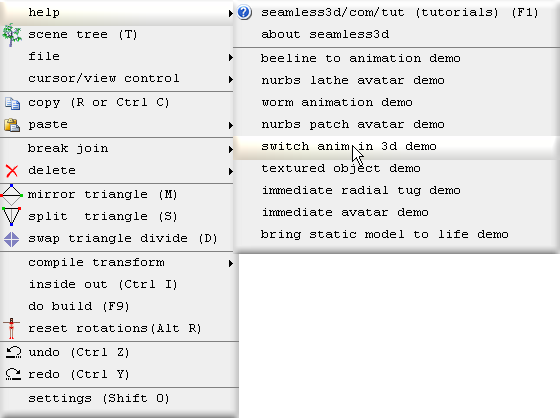
Begin
Start the robot demo by moving the mouse to the top left corner of the 3d window
and selecting:
beeline to animation demo
All of the titles for the robot demo operations will be shown here in bold beginning with the operation number followed by the title itself. Any comments for the operation will be explained under the title.
0. Create a new seamless file
The
 button is clicked to create a new smls file.

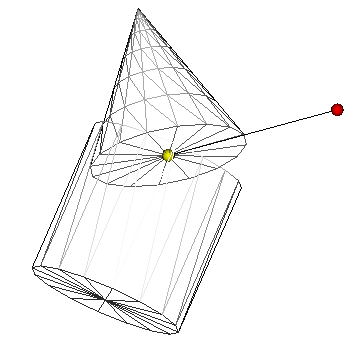
X-Ray mode lets us see the location of the pivot points (the small yellow sphere in the 3d window represents the pivot point) of the parts (the Part node looks like a bone:
 ).
And when the parts are connected to each other X-Ray mode shows us graphically the 3d skeleton structure.
X-Ray mode can be toggled on or off at any time but a Part node must be selected when clicking this button.
).
And when the parts are connected to each other X-Ray mode shows us graphically the 3d skeleton structure.
X-Ray mode can be toggled on or off at any time but a Part node must be selected when clicking this button.
1. Build a cone
While the part node is selected, the
 button is clicked from the horizontal toolbar to create a ConeBuild node that references the selected part.
The part is the node that contains the triangles while the ConeBuild is the node
that generates the triangles for the part.
button is clicked from the horizontal toolbar to create a ConeBuild node that references the selected part.
The part is the node that contains the triangles while the ConeBuild is the node
that generates the triangles for the part.
2. Setup animation
A new Anim
 node is added to the scene by dragging a
from the new node bar to the Scene
node is added to the scene by dragging a
from the new node bar to the Scene
 node.
node.
The new Anim
node in the scene is clicked on to open the Anim's control panel.

The up/down period  button is clicked to specify 2 seconds.
3. Set first pose
Part cone is selected in the scene tree and because the Anim bar is open, the part displays it's animation control points in the 3d window (the yellow and red dots joined by a line).
The red dot (the orientation control point) is dragged to change the orientation
of the part. This action automatically adds interpolators and script lines to our Anim node in the scene tree.
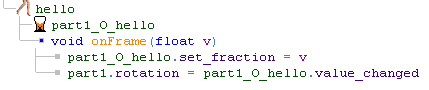
but there is absolutely no need to concern ourselves with what they mean unless
we want to. It is perfectly fine to click to the left of the Anim node (to collapse it) so that we only see the Anim
node in the scene tree:
After the pose has been recorded for the beginning of the time-line, the play
 button is clicked to play the animation.
4. Set second pose
To make our animation more interesting a new pose is inserted in the middle of the
time-line. Notice how after the orientation control point is released, a red mark
is added to the time-line to show where
the pose was recorded. A pose can be deleted by clicking the delete  button. The recorded pose can be moved to another point in the time-line by dragging
the red mark. (do not drag a red mark past another red mark
for version 2.121 because of a bug that will be fixed for 2.122)
button. The recorded pose can be moved to another point in the time-line by dragging
the red mark. (do not drag a red mark past another red mark
for version 2.121 because of a bug that will be fixed for 2.122)
5. Copy the first pose and paste to last pose
Typically we want an animated
sequence to end with the same pose it begins with. The easiest way to do this is
copy
 the first pose and paste
 it in as the last pose as shown.
6. Build a cylinder
A new part
is added to the Seamless
 node and then the new part is slected and
the
node and then the new part is slected and
the
 button is clicked to create a CylinderBuild node that references it.
7. Move cone Up
The ConeBuild's translation up/down buttons are used to move the Cone so that it sits on top of the cylinder.
8. Move cone's pivot point Up
Regardless of whether we are animating or not, if in wire-frame mode and if a part node is selected in the scene tree, the location
of the part's pivot point (the point that a part orientates around when animated)
is shown in the 3d window by a yellow dot. The pivot point can be moved to any location using the part
node's pivotPoint field.
9. Animate cylinder
We do the same as we did for part1 to animate part2.
Note at this stage no part's animation is influenced by the other part because both parts are arranged as siblings (no part branches from the other) in the scene tree.
10. Move cone as a child of cylinder
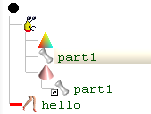
In the scene tree part1 is dragged to the right of part2 and released so that it plugs into part2 as a child of it (no longer a sibling). Straight after this is done we can see how part2 now influences part1's animation. From here we can see how to structure parts in the scene tree for animated joints.
11. Move cylinder's pivot point up half way
Because a part's pivotPoint value is relitive to it's parent's (the part it is pluged into) pivot point, we need to move part2's pivot point back after moving part1's pivot point up in order to keep part1's pivot point in the same location.
12. Animate position
Here we animate the position of a part instead of its orientation. This is done
by dragging the yellow control point instead of the red control point. The yellow
control point is actually the pivot point, however
we are not changing the location of the pivot point in relation to the part when
we drag it because the part moves with the pivot point when we drag it. The yellow
control point can only be dragged while the Anim bar is open same as for the orientation
control point. Dragging the
yellow control point changes the part's
translation field and dragging the red control point changes
the part's rotation field. We can also set the
rotation and translation
fields directly using the part's control panel to set a pose in the time-line.
Same as with all rotation fields, the
rotation buttons will change the orientation in absolute right angle
amounts while the control key is held down.
13. Create a bxx av PROTO by adding a GestureGroup
A GestureGroup node is added to the scene.
This only needs to be done if we want to use our animated model as an avatar in a Blaxxun multi-user world.
A GestureGroup
node causes Seamless to output the scene contained inside a Blaxxun Avatar PROTO.
[3d Modelling Software] [Tutorials] [Forum] [Features] [Download] [Gallery] [FAQ] [Worlds] [Avatars] [Links] [Thyme]